
***Update: The blank palette below is now available for purchase. Click this link to view.****
My church is getting into VBS mode as our annual event is quickly approaching. Our VBS is scheduled for June 9 - June 13, 2014, so we don't have too much time left to create in anticipation. We are using Cokesbury's Workshop of Wonders as our theme this year, and we are busy coming up with ideas to transform our church into a workshop/art studio to engage the children who join us.
These adorable easels are going to be used as place card holders on our craft table. The easels are very easy to assemble and very low cost. I've cut out an artist's palette from cardstock to use as our place card.
 |
| Finished DIY Easel |
- Skinny Sticks - 3 and 1/2 sticks per easel - I cut the sticks in half using children's Fiskar scissors. But watch out! They fly if you aren't careful. I found these at Wal-Mart for $2.47.
 |
| Skinny Sticks |
- Tacky Glue
- Hot Glue Gun and Glue Sticks
Step 1: Assemble the frame
Place a dab of Tacky Glue near the top of one full length Skinny Stick. Attach a second full length Skinny Stick as pictured below so that you form a V with about 3 inches between the open ends of the V.
 |
| Place Tacky Glue at end of full length stick |
 |
| Ends should be 3" apart |
Place a dab of Tacky Glue about 2" up each of the Skinny Sticks as pictured below. Attach the 1/2 Skinny Stick centered across the two dabs of glue with the skinny edge down. The wider edge will hold your place card. Once the Tacky Glue sets a little, carefully wipe/scrape off the excess glue.
 | |
| Place glue about 2" from the bottom of each stick |
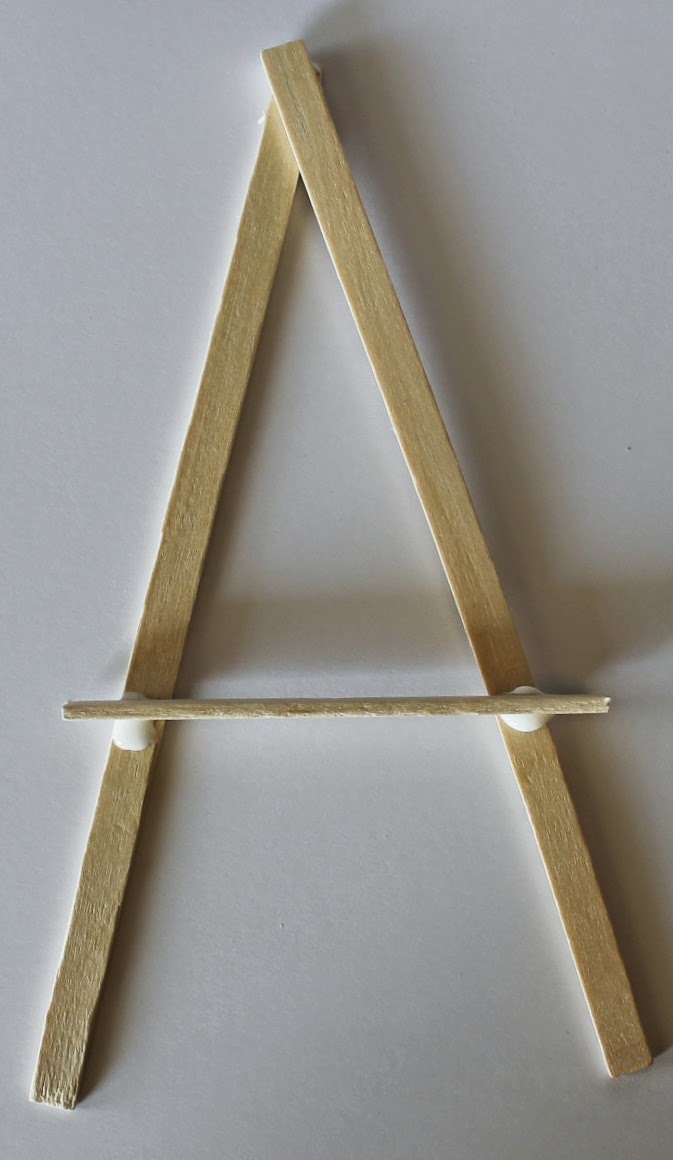 |
| Attach cross bar to the glue with the skinny edge in the glue |
Wait to move the Frame and Cross Bar until after the glue has completely dried. If you are in a hurry, you can use hot glue for all of these steps. I prefer the Tacky Glue because I think it looks cleaner when it's finished, but hot glue is much, much faster so if you are in a hurry, that may be the way you want to go.
Step 4: Attach the Support Leg
Place a drop of hot glue on the back of the Frame where the two full length sticks meet. Attach the support leg by holding the end of the third full length stick firmly against the hot glue you just placed until set. The support leg should be positioned in the same direction as the two full length legs in the Frame. You want the support leg to attach at about a 45 degree angle so that the easel is upright, but leaning back slightly so your place card will sit securely.
 | ||
| Put hot glue on the back of the frame to hold the support leg |
 |
| Attach support leg at 45 degree angle from frame with stick in same direction as legs of the frame |
And there you have it. A simple and inexpensive decoration for your VBS craft table!
 |
| Finished DIY Easel |
Do you have any great ideas for the Workshop of Wonders VBS theme? I would love to hear them!!!
No comments:
Post a Comment