My family LOVES to travel to Disney World. We go frequently (not frequently enough for us) and in between trips we are always planning our next trip. One of the many projects that I always work on for our vacations are autograph books. I know that my children and nephews would be happy with the standard autograph books they can buy in the parks, but I enjoy making autograph books for them and they seem to enjoy the interaction with the characters that the pre-made pages seem to always ignite.
I am beginning to work on my autograph books for our next trip. I am working on .svg files for many different Disney characters so check back often if you are interested in these files. I hope that some of these files may be able to help others with their autograph books too!
Nemo with Seaweed
Dori

Tuesday, June 10, 2014
Saturday, June 7, 2014
DIY Oklahoma Chevron Canvas
My sister, Kristin, and I were in Hallmark recently and saw a very cute red and white chevron canvas with the shape of Oklahoma on it. It was adorable, and we almost bought it, but we thought we would give it a DIY try first. I am so glad we did! I am thrilled with how this project turned out.
Supplies:

11" x 14" white canvas
Silver cut out of the state of Oklahoma***
Red Acrylic Paint
White Acrylic Paint
Foam Paint Brush (or three)
Blue Tailor's Chalk
Baby Wipe/Wet Paper Towel
Long ruler/straight edge
Chevron Pattern (I used a 1" wide chevron here)***
and PATIENCE
***You can cut these out yourself by tracing the shape of Oklahoma and a chevron design onto cardstock and cutting them out. If you are interested, I have listed the silver Oklahoma used here on etsy. You can click here to view the listing. If you purchase the Oklahoma die cut and are interested, make a note in the check out notes to seller that you would also like the chevron pattern, and I will send that for free!***
Step 1: Paint the canvas white.
The first step in making this Oklahoma Chevron Canvas is painting the entire canvas white. I know the canvas is already white and it may seem like a waste of time, but it is so helpful when making any touch ups at the end. The touch ups are not nearly as visible when the entire canvas has been painted white already. Allow the paint to dry thoroughly before moving on to the next step.
Step 2: Prep the canvas
Using a long ruler or straight edge, trace a straight line across your canvas 4.5" from the bottom edge of the canvas with the blue tailor's chalk. Place the bottom points of your chevron patter on the straight line you have just drawn. Trace both sides of the chevron pattern using the tailor's chalk. I just hold the pattern making sure it remains lined up against the base line, but you may find it easier to use low tack painter's tape to hold down the pattern - just make sure the paint is very dry if you do.
Step 3: Trace the chevron pattern
Place the chevron pattern just above the first chevron row you traced in step 2. Align the bottom of the pattern with the top line of the chevron already on your canvas. Continue doing this until the entire canvas is covered. You will shift to using aligning the top edge of the pattern with the bottom edge of the chevron on the canvas once you reach the top of the canvas and move below your initial base line.


Step 4: Paint the chevron pattern
Carefully, paint every other row of the chevron pattern you traced earlier. I mark the rows I will be painting with a very light mark with the tailor's chalk to help ensure that I don't accidently paint the wrong row.
Step 5: Touch up any mistakes
If any of the paint from the chevron pattern ended up in what should have been white, touch up using white paint. Carefully, paint the entire width of the white so that when the paint dries the touch up will be less noticable. Allow to dry completely.
Step 6: Remove any remaining tailor's chalk.
With the baby wipe or wet paper towel, gently rub any remaining tailor's chalk to remove from the canvas. Be very careful as too much water can cause the paint to run. It won't take much pressure to remove the chalk so take it slow and easy.
Step 7: Attach the Oklahoma cut out
Paint the entire back of your Oklahoma cut out with a thin layer of Tacky Glue. Make sure to cover the entire surface right up to the edges of the paper, but not so thickly that glue seeps out from under the edges. Place your cut out on the canvas where you would like it to stay. I like to make sure that the heart is on a red line so that it's more pronounced, but you can place your cut out anywhere on the canvas.

I know it looks like a lot of steps, but it is really a pretty easy process. The tailor's chalk makes the process easy because I can see the chevron pattern while painting, but it removes easily and cleanly when I'm done. I do recommend using as light of markings as possible when you are tracing so that the markings are even easier to remove.
I would love to see your finished projects or hear any of your suggestions!
Thanks for stopping by!
Kasey
Supplies:
11" x 14" white canvas
Silver cut out of the state of Oklahoma***
Red Acrylic Paint
White Acrylic Paint
Foam Paint Brush (or three)
Blue Tailor's Chalk
Baby Wipe/Wet Paper Towel
Long ruler/straight edge
Chevron Pattern (I used a 1" wide chevron here)***
and PATIENCE
***You can cut these out yourself by tracing the shape of Oklahoma and a chevron design onto cardstock and cutting them out. If you are interested, I have listed the silver Oklahoma used here on etsy. You can click here to view the listing. If you purchase the Oklahoma die cut and are interested, make a note in the check out notes to seller that you would also like the chevron pattern, and I will send that for free!***
Step 1: Paint the canvas white.
The first step in making this Oklahoma Chevron Canvas is painting the entire canvas white. I know the canvas is already white and it may seem like a waste of time, but it is so helpful when making any touch ups at the end. The touch ups are not nearly as visible when the entire canvas has been painted white already. Allow the paint to dry thoroughly before moving on to the next step.
Step 2: Prep the canvas
Using a long ruler or straight edge, trace a straight line across your canvas 4.5" from the bottom edge of the canvas with the blue tailor's chalk. Place the bottom points of your chevron patter on the straight line you have just drawn. Trace both sides of the chevron pattern using the tailor's chalk. I just hold the pattern making sure it remains lined up against the base line, but you may find it easier to use low tack painter's tape to hold down the pattern - just make sure the paint is very dry if you do.
Step 3: Trace the chevron pattern
Place the chevron pattern just above the first chevron row you traced in step 2. Align the bottom of the pattern with the top line of the chevron already on your canvas. Continue doing this until the entire canvas is covered. You will shift to using aligning the top edge of the pattern with the bottom edge of the chevron on the canvas once you reach the top of the canvas and move below your initial base line.
Step 4: Paint the chevron pattern
Carefully, paint every other row of the chevron pattern you traced earlier. I mark the rows I will be painting with a very light mark with the tailor's chalk to help ensure that I don't accidently paint the wrong row.
Step 5: Touch up any mistakes
If any of the paint from the chevron pattern ended up in what should have been white, touch up using white paint. Carefully, paint the entire width of the white so that when the paint dries the touch up will be less noticable. Allow to dry completely.
Step 6: Remove any remaining tailor's chalk.
With the baby wipe or wet paper towel, gently rub any remaining tailor's chalk to remove from the canvas. Be very careful as too much water can cause the paint to run. It won't take much pressure to remove the chalk so take it slow and easy.
Step 7: Attach the Oklahoma cut out
Paint the entire back of your Oklahoma cut out with a thin layer of Tacky Glue. Make sure to cover the entire surface right up to the edges of the paper, but not so thickly that glue seeps out from under the edges. Place your cut out on the canvas where you would like it to stay. I like to make sure that the heart is on a red line so that it's more pronounced, but you can place your cut out anywhere on the canvas.
I know it looks like a lot of steps, but it is really a pretty easy process. The tailor's chalk makes the process easy because I can see the chevron pattern while painting, but it removes easily and cleanly when I'm done. I do recommend using as light of markings as possible when you are tracing so that the markings are even easier to remove.
I would love to see your finished projects or hear any of your suggestions!
Thanks for stopping by!
Kasey
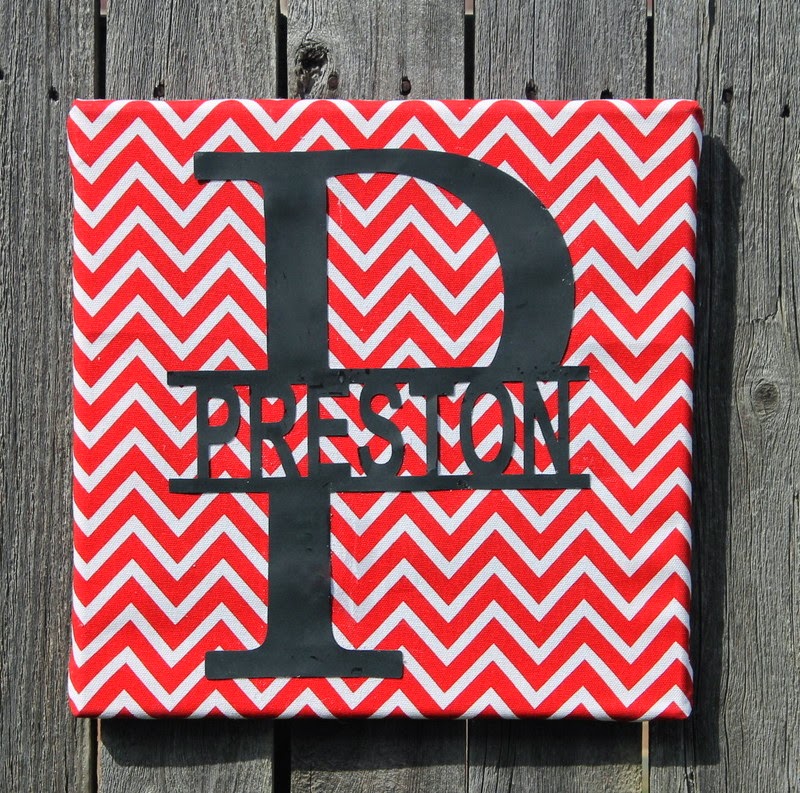
DIY "Stretched Canvas"
I recently painted a canvas chevron for my sister. (You can see that project here.) I was very happy with how it turned out, but the painting took a very long time. It was somewhat tedious to draw out the lines and it took several coats of paint for a uniform look. It was worth it, but it did make me wonder if there were an easier way. Those of you who are talented painters may not think this is easier, but I do like the great results I can be assured of with this method.

This is probably so far from the "right" way to do this, but it works and looks great on my son's wall :).
I bought 4 - 12" stretcher bars at Hobby Lobby and slide the ends together. After verifying that the frame was square. I then put a row of staples across each of the corners to help them stay in place. So many staples probably weren't necessary, but hey, I don't think it hurt anything either.


I then laid out my 15.5" fabric square face down. The fabric I used is a red chevron Duck fabric. I laid the frame in the center of the fabric, and then folded the top edge of the fabric over the top edge of the frame and put a staple in the center. I then did the same thing for the bottom - making sure the design was straight and that the fabric is pulled tight across the frame. I then did the same thing for each of the sides.


The next step was to fold the corners. Some people will probably have more luck with doing the corners as they go, but I couldn't get the fabric to stay tight that way. I basically folded the corners as if I were wrapping a present. Please forgive the many close up pictures here, but I wanted to be clear as this was the hardest part of the entire project.


After that, I put a few more staples in to make sure everything stayed put (again, undoubtedly way too many). I then glued a paper die cut of my son's name on the front! I have listed these split initial names in my etsy store. You can view it here, if you are interested.

So now instead of painting a canvas, I can easily make my own using inexpensive fabric from the craft store. Do you have any projects like this that you have made? Any tips you could share with me for my next attempt?
Kasey
This is probably so far from the "right" way to do this, but it works and looks great on my son's wall :).
I bought 4 - 12" stretcher bars at Hobby Lobby and slide the ends together. After verifying that the frame was square. I then put a row of staples across each of the corners to help them stay in place. So many staples probably weren't necessary, but hey, I don't think it hurt anything either.
I then laid out my 15.5" fabric square face down. The fabric I used is a red chevron Duck fabric. I laid the frame in the center of the fabric, and then folded the top edge of the fabric over the top edge of the frame and put a staple in the center. I then did the same thing for the bottom - making sure the design was straight and that the fabric is pulled tight across the frame. I then did the same thing for each of the sides.
The next step was to fold the corners. Some people will probably have more luck with doing the corners as they go, but I couldn't get the fabric to stay tight that way. I basically folded the corners as if I were wrapping a present. Please forgive the many close up pictures here, but I wanted to be clear as this was the hardest part of the entire project.
After that, I put a few more staples in to make sure everything stayed put (again, undoubtedly way too many). I then glued a paper die cut of my son's name on the front! I have listed these split initial names in my etsy store. You can view it here, if you are interested.
So now instead of painting a canvas, I can easily make my own using inexpensive fabric from the craft store. Do you have any projects like this that you have made? Any tips you could share with me for my next attempt?
Kasey
Sunday, June 1, 2014
VBS Decorating Gears
As we move closer to VBS 2014, we are getting deeper and deeper into all things Workshop of Wonders. This week we have been trying to come up with some larger decorating ideas that will enhance the scene for the children, but not take too much work for our volunteers - going up or coming down. Our church is hosting a family reunion the day after VBS is over this year, so we have to get everything cleaned up and back in normal order following our annual cook out on Friday night. This has caused the easy clean up aspect of all VBS decorations to take on an even more important role this year than usual.


One idea that we've come up with and seems to be working well for us are large gears cut out of poster boards with the Wonder Words of the day attached. Theses were very easy to make and very inexpensive.


We cut out 1/4 of a gear on a Cricut. The 1/4 gear was about 11" x 11" at it's largest. We then cut 4" off of one end of a poster board leaving us with a 22" square poster board. We marked the center of the poster board and then traced the gear 4 times rotating around the center point. I did this for all five of the poster boards we were using. I then cut out the Wonder Words for each day, again using the Cricut. I took the posters with the traced gears and the cut out letters to our VBS craft meeting, and some of the ladies who wanted to help, but were not able to move around much were very happy to cut out the gears and glue on the letters.

I am so happy with how they turned out and the look great on the church walls. It was also a great project for our older ladies who want to help, but have some physical limitations. Do you have any other projects that you use in this way to make sure you include everyone who wants to help?
One idea that we've come up with and seems to be working well for us are large gears cut out of poster boards with the Wonder Words of the day attached. Theses were very easy to make and very inexpensive.
We cut out 1/4 of a gear on a Cricut. The 1/4 gear was about 11" x 11" at it's largest. We then cut 4" off of one end of a poster board leaving us with a 22" square poster board. We marked the center of the poster board and then traced the gear 4 times rotating around the center point. I did this for all five of the poster boards we were using. I then cut out the Wonder Words for each day, again using the Cricut. I took the posters with the traced gears and the cut out letters to our VBS craft meeting, and some of the ladies who wanted to help, but were not able to move around much were very happy to cut out the gears and glue on the letters.
I am so happy with how they turned out and the look great on the church walls. It was also a great project for our older ladies who want to help, but have some physical limitations. Do you have any other projects that you use in this way to make sure you include everyone who wants to help?
Subscribe to:
Comments (Atom)